 |
|
|
|
|
|
|
|
SCRC Data Capture and Analysis Software TutorialsXsrv+PuTTY on a StickIn furthering our goal of enabling users of the SCRC analysis software to analyze anywhere, we've put together a compact, portable set of Windows software to allow easy setup of remote X Window sessions via SSH. It's actually two packages combined together: the VcXsrv X Window server and the PuTTY terminal emulator and SSH client. We've configured these so they can be run from a portable USB memory stick, so we call this setup Xsrv+PuTTY on a Stick. However, it can also be setup on any Windows hard drive. Our intent was to put together a small and portable X server that was:
To accomplish this, we put together two packages and some of our own configuration files, to make it all work together nicely. The major component is the X Window server. Of the leading free X servers for Windows, we chose VcXsrv over Cygwin/X because it is much more self-contained, which makes it more portable. We had used Xming in the past, but the free version of it hasn't been updated in almost 10 years. We added in an entry to the system.XWinrc configuration file for launching a new PuTTY session. We used a modified version of PuTTY called PuTTYtray, again for portability, mainly to avoid PuTTY's use of the Windows registry for its configuration. Other PuTTY variations are available that use configuration files instead of the registry, but we settled on PuTTYtray because it seems to be actively maintained (some others like portaPuTTY use older PuTTY source and don't have the latest security fixes), and also because it can transfer configurations from the registry to files and back again. Finally we set up Session profiles for our systems, and default settings that include all the features and options we like to use to connect to our systems. You can download Xsrv+PuTTY on a Stick from here: Extract the ZIP file into the root folder of your USB stick, or into any folder on your hard drive where you want to put it. (The Desktop works well for this.) It will create a sub-folder called VcXsrv when you extract it. That's all there is to installing it. To run it, double-click on the icon named Start VcXsrv+PuTTY.cmd.Update - June 1, 2018: The VcXsrv.zip package was updated on our web site to include the latest release of VcXsrv (version 1.20.0.0 released June 1, 2018) and the latest stable beta release of PuTTYtray - 0.67-t029. If you're running an older download of VcXsrv.zip, or Xming.zip, we recommend you download VcXsrv.zip and try it instead. It fixes a font loading problem in the 1.19.2.0 release, and has security updates in its SSL libraries, as well as a number of other bug fixes. We used the 32-bit version of VcXsrv, not the 64-bit version, so that it will run on more systems. We also make a 64-bit package for use with WSL installations, which is used by one of our installation scripts for WSL systems, as the 32-bit of VcXsrv version can't launch a bash.exe session from the menu.
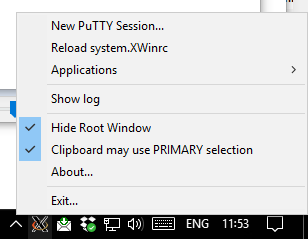
This command file starts up VcXsrv in the background, using a number of configuration options that make it behave the way we want, most notably that it runs in a rootless, multi-window configuration which allows X Window applications to co-exist with Windows applications on the same desktop. Once started, VcXsrv puts an X icon in the task bar. Right-click on this icon to get VcXsrv's pop-up menu, from which you can select New PuTTY Session... to start up a terminal connection to one of the capture and analysis systems. This brings up PuTTY's configuration window, from which you can select and start up a new terminal session, as well as set up and save your configuration options for these sessions. Our VcXsrv.zip package comes with pre-defined sessions for all of the SCRC's current data capture and analysis systems, which can be used as-is to connect to our servers, or you can use these as a starting point for new system configurations. To connect to one of these servers, simply double-click the server name in the list of stored sessions. A double-click will do the same as single-clicking the name, then clicking on Load and then Open.
Important note: PuTTY does not load any saved sessions from file automatically at start up. Unless you explicitly select and load one, it will start up with its own built-in default settings (not the Default Settings from file), which don't enable X11 forwarding through SSH so they won't support X Window applications. So, to connect to a different system than the ones in the sessions already configured, load one of the existing saved sessions from file, change the host name (and login username from the Connection/Data if necessary), then save the session under a new name. Then any time after that, you just need to double-click on the saved session name to open that session on the saved host name. This is described in more detail below. Once you've opened a session, the PuTTY window will ask you for a password. After that, you should get a command prompt in that window, allowing you to enter commands. Using a remote X session, the mouse buttons should work as expected, though it's possible that Windows won't support the middle button transparently. Any X Window applications that you run from the xterm window, including most programs in the analysis software suite, should open their own windows right on your desktop, co-existing with any Windows application windows you may have running. All these sessions are set up to enable X11 forwarding through an SSH tunnel. This allows secure access to X Window applications on our servers from just about anywhere, even from PCs behind firewall systems, or on public networks. The first time you connect to a new system, PuTTY will pop up a Security Alert window, telling you that the server's host key is not cached. This is a security feature that allows PuTTY to confirm that it is indeed connecting to the system you want. It's a good idea to establish your first connection while on a secure network, so you know you're getting the real deal. Click on the Yes button to cache the new key. PuTTYtray will cache new keys in the folder VcXsrv\sshhostkeys, unless earlier PuTTY host keys were previously cached in the registry. On subsequent connections, PuTTY will see that the host key from the connection matches the one it has cached, so it knows that the server is not a fake, even when connecting from an unsecured public network. All data passed between PuTTY and the server will be encrypted, including your user name and password, as well as all data between your PC and any X Window applications you run on the server. It's very easy to change your session configurations, or to set up new saved sessions in PuTTY as well. Use one of the existing sessions, or the Default Settings, as the starting point. Single-click on the name of one of these, click on Load, and then browse through the options by selecting categories from the Category pane on the left. You can turn off X11 forwarding for a session, to support plain-text terminal sessions with ssh servers that don't support X11, by clicking on the + sign next to SSH, under the Connection category, then click on the X11 category under SSH, and finally uncheck the box labeled "Enable X11 forwarding". (Note: only uncheck this option if you don't want to use X Window applications on that system, or if it doesn't support them. To use X Window applications for a session, make sure the "Enable X11 forwarding" option is checked.) To use a different user name than "exp", which we commonly use on our servers, select the Data category under Connection, and change or clear the text box labeled "Auto-login username". If you leave this field blank, then PuTTY will ask you for your username before you get the password prompt, whenever you open this connection. There are many more options as well, including how the Backspace key and the system bell are handled, the font and colours used, the initial window size and resizing behaviour. When you've set these as required, go back to the Session category at the top, and change the Host Name (or IP address) for the connection. Then, enter the session name (usually the host name) in the "Saved Sessions" text box, and click on the Save button. The new session name should appear in the list below. By default, PuTTYtray saves sessions in a file (when "Sessions from file" is selected), and these will be stored in the VcXsrv\sessions folder. If "Sessions from registry" is checked before saving, they will go in the Windows system registry instead. For portability, e.g. if you're using a USB memory stick, make sure you're saving and loading sessions from files. When you're done running your X Window sessions, you should close things up. Begin by exiting all your running X applications, or closing their windows. Then logout from all your PuTTY windows, usually using Ctrl-D, or the exit or logout command. Finally, when all the X and PuTTY windows are closed, you can exit VcXsrv by right-clicking on its task bar icon, and selecting Exit. VcXsrv will ask to confirm that you want to want to exit, and shows the number of clients currently connected. You can usually ignore this number, if you've already saved your work and closed all your windows - the number might include the SSH tunnels opened by PuTTY, which could still counted even after you've logged out. Click on the Exit button to close it all up, and then you can right-click on the "Safely Remove Hardware" icon in the task bar to get Windows to finish with your USB memory stick so you can remove it. See also: SCRC Software On-line Documentation, SCRC Software Tutorials |
|


|
|
© Copyright 2018 G. R. Detillieux,
Spinal Cord Research Centre,
University of Manitoba.
All Rights Reserved.
Contact Us
for more information.
| Revised June 1, 2018. |
|