 |
|
|
|
|
|
|
|
SCRC Data Capture and Analysis Software TutorialsAnalyze Anywhere: a Guide to Running Analysis in Various Environments[ On Linux | On the Mac | Remote X (X-Win32) | Remote Desktop | On the Web | VNC (in web browser) | Cygwin | WSL & Virtual Machines | Mouse Buttons | Password Security ]Users of the SCRC analysis software have many ways of running this software, on many different platforms. Each different way of running the software can present its own unique set of wrinkles or challenges, as something that has become familiar in one environment can be strangely different, or not work at all, in another. This guide should help you work through these various quirks, by explaining each of the platforms on which our software runs, and what potential pitfalls you may encounter there. Please help us keep this tutorial up to date. If you run into any other quirks or problems that are not explained here, please let us know so we can include a description and fix or workaround. 1. On Linux SystemsOf all the supported operating systems on which the analysis software runs, the Linux operating system (and especially Red Hat derived distributions) is the primary platform. Although there are many different flavours of Linux around, and several desktop environments available under Linux, all with their own unique peculiarities, most of these are almost inconsequential to how the analysis software runs. This software uses only the most basic X Window System graphics, which all of the various Linux distributions and desktops provide, so running the analysis software is almost the same on all of these systems.
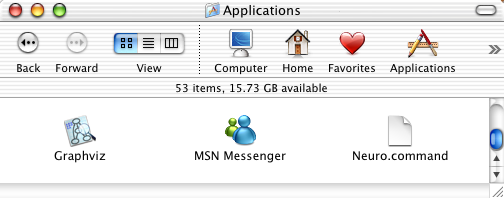
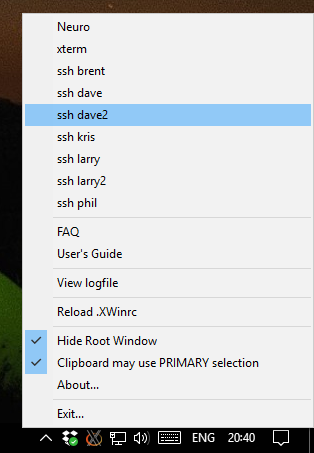
Once logged into Linux, you can launch the terminal application from the the icon on the top panel menu bar, and use the command line from the terminal window. Alternatively, if you prefer using the Neuro front-end program, you can double-click its icon on the desktop to launch it. Most Linux systems will be equiped with a 3-button or wheel mouse, so using these should be straightforward as all mouse buttons should work as expected. 2. On the MacNote: We have been unable so far to get the analysis software to run under recent releases of macOS (10.9 & up). If you're running a release between 10.2 and 10.8, the analysis software can be installed and run on your Mac. For newer releases, until we work out a solution, you will have to use either a remote X11 session to a Linux system, or run the Cygwin version under Windows using Parallels Desktop. Setting up a Linux virtual machine under Parallels is also an option. The analysis software runs on Mac OS X, but doesn't make use of the native "Quartz" user interface of OS X. Instead, it runs under the X11 system, which is available on Mac OS X. The easiest way to get X11 support on the Mac is by downloading and installing the XQuartz application. Once installed, it should appear in the system's Applications/Utilities folder in the Finder, which you can drag over to the dock for easy launching. The XQuartz application must be running for the analysis software to be able to open its windows. Also, the analysis software is not installed in the standard directories that are part of the default execution path, so a little bit of setup of environment variables is needed to run this software. For these reasons, there is a command script, Neuro.command, included with the Mac OS X version of the software to automate the startup process.
You can find Neuro.command in the /Applications folder of your Mac, but for convenience you may want to copy it to your Desktop, for easy access. Unfortunately, command scripts can't run from the application dock on OS X. Double-click on Neuro.command to start it up. It will make sure the X11 application is installed and running, and will start it up if it isn't already running. It will also start the neuro front-end program with the correct command execution path and other environment variables set to allow the analysis software to run. Any other application launched by X11, including xterm, should also have all the right environment variables set if X11 was launched by the Neuro.command script. This script also adds an item to neuro's menu to set the default printer, using the Print Center application. If you'd rather run the analysis software from OS X's Terminal application, you can do that (as long as you've launched the X11 applications) if you add these two lines to the .profile file in your home directory:
If you use a 3-button mouse, wheel mouse or Apple's "Mighty Mouse" on your Mac, using it should be straightforward as all mouse buttons should work as expected. But if you're using a single button mouse or trackpad, be sure to read about Using the Mouse Buttons so you can access all the choices that the analysis software allows for mouse input. Any USB mouse should be plug-and-play under Mac OS X, so pick one that will make your life easier. 3. On X-Win32 or other Remote X Window sessionsIt is often handy to access a Linux-based data capture or analysis system remotely, via a networked X Window session, rather than logging in directly to the system's own console. This allows you to work from your own desktop or laptop system. Here at the University of Manitoba, we use StarNet's X-Win32 package, as we have a site license for it. Other X Window packages are available for Windows and Mac systems, and are included with Linux systems. One free alternative to X-Win32 for Windows systems is Xsrv+PuTTY on a Stick.
To launch an X session with X-Win32, first make sure it is running. You should have an X icon in your task bar's notification area on the right if it is. If not, start X-Win32 from the Start menu, or desktop or quick-launch icon. Then, click on the X icon in the task bar to get X-Win32's session menu, and from there, select the system to which you wish to login. If the system isn't listed there, you can add one by right-clicking on the icon and selecting X-Config from the menu. In the X-Config window, there is a Wizard that guides you through adding sessions to your list. Make sure you use the SSH connection method for launching sessions on our Linux systems. Once you've opened a session, X-Win32 may or may not ask you for a password, depending on whether you've saved the password in the session profile. After that, an xterm window should open, allowing you to enter commands. Using a remote X session, the mouse buttons should work as expected, though it's likely that Windows won't support the middle button transparently, so you may need to use the technique described in the section on Using the Mouse Buttons below. Any X Window applications that you run from the xterm window, including most programs in the analysis software suite, should open their own windows right on your desktop, co-existing with any Windows application windows you may have running. To start a remote X Window session from a Mac or another Linux system, you need to run the ssh command from your xterm window (or any terminal window on a Linux system), giving the arguments -X followed by the name of the system to which you want to connect. For example:
Note that we no longer support the rexec connection method on our systems. When using an rexec connection for launching sessions, your password is sent unencrypted over the network. This method should only be used on trusted networks. See the section on password security below for details. 4. On Remote Desktop
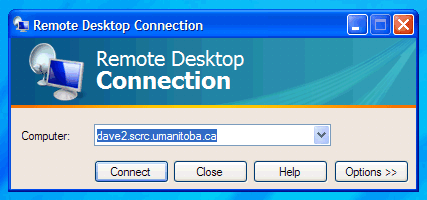
The SCRC's analysis server, dave2, as well as one of our capture systems, had previously been set up to allow Remote Desktop connections. However, the server that implemented this under Linux, xrdp, has not been updated recently and does not implement a secure login mechanism. For this reason, we have discontinued this service on our Linux systems. Instead, you can securely use Remote Desktop to login to your own Windows desktop machine on campus, and from there connect using X-Win32, if you don't have any remote X Window connection capability on your off-campus system.
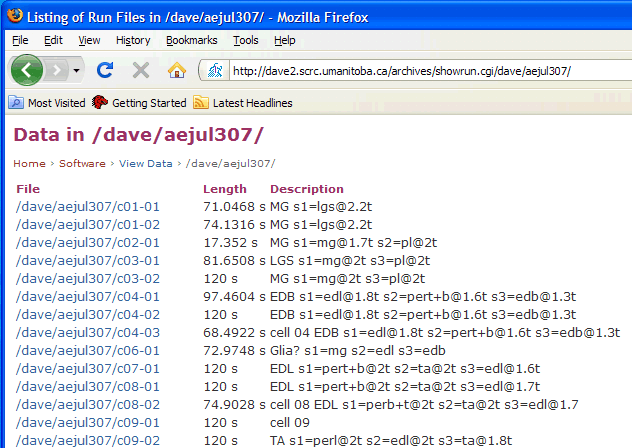
Combining Remote Desktop and X-Win32: 5. On the Web, in your BrowserThe SCRC's analysis server, dave2, has an archive of captured data from our electrophysiology labs. In addition to accessing this archive via Remote Desktop or remote X Window sessions, as described above, it can also be accessed via a web browser. This web-based interface to the archives is usually accessed by clicking the View button in our FileMaker Experiment Database, but it can also be accessed directly by a Login to the Data Archives Server. Either way, you will need to provide your login user name and password. Note that when you login to the web server, using an "http:" URL rather than "https:", your password will be sent unencrypted over the network. This method should only be used on trusted networks. See the section on password security below for details. As much as possible, you should use HTTPS logins to our server, for secure, SSL-encrypted data transfers between your browser and our system. In the future we may force non-encrypted HTTP logins to redirect to HTTPS. You will need to tell your browser to accept the server's SSL certificate the first time you connect using HTTPS. Browsing the data archives is done through the showrun script on the analysis server, the same web interface as browsing the Sample Data to View/Download on our main web server. When browsing an experiment directory, you will get a directory listing as shown in this figure:
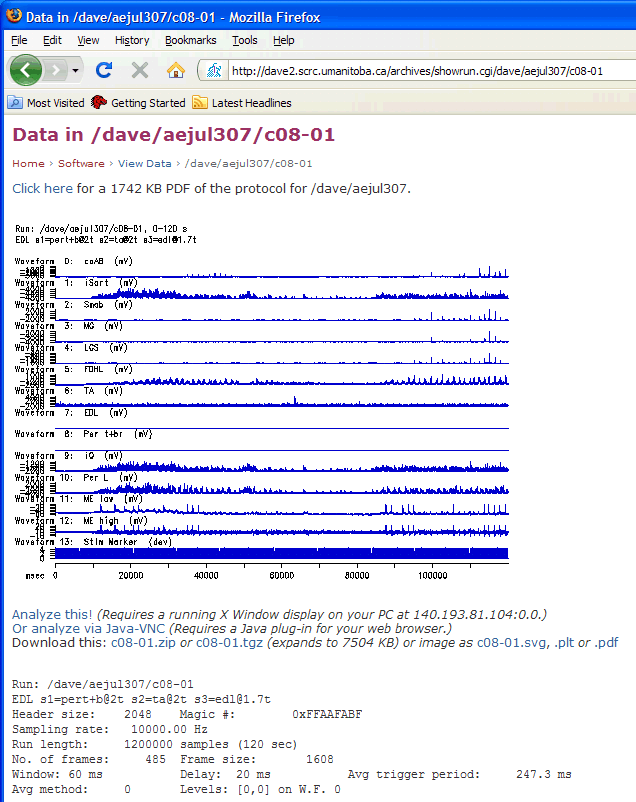
When browsing a run file within an experiment, you will see a summary page that shows a thumbnail image of the data in that run, as well as a listing of traces and waveforms in the run, and several other capture parameters. This summary page appears much like the one shown in this figure:
The web interface can also accept analysis parameters as part of a query string at the end of the URL, or web address, of the summary page. This query string begins with a question mark, "?", after the path to the data file, and consists of query parameters in the form "name=value", with two or more of these parameters being separated by an ampersand, "&", or semicolon, ";". The most important one of these query parameters is aparm, which gives a series of analysis commands (keystrokes) for setting various analysis parameters. This aparm value can also be set by modifying the parameter fields in the FileMaker database. A number of characters have a special meaning when used within the aparm value:
Other query parameters can also be set in the URL's query string, such as width, height and out. The FileMaker database will include width and height values in the query string it sends to the web browser, to get a larger image displayed in the summary page. These width and height are specified in pixels. The out query parameter is typically used internally by some of the links that the showrun script generates, but its purpose is to specify an alternate image format, one of gif (the default), png, or svg, or to save the plot in plt or pdf format. Additionally, a vnc query parameter is used internally to launch an in-browser VNC session, as described below. In addition to the image of the data and the listings of traces, waveforms, and capture parameters, the summary page also presents a number of links to click for additional information. If the experiment protocol for the currently viewed experiment is online, there will be a link to the PDF file for it. There are also links to download the current run's data files as a ZIP file or compressed TAR archive (tgz), or the current image as a vector graphic in SVG, HPGL (.plt) or PDF format. Finally, there are two links that allow further analysis of the current run. The first of these, "Analyze this!", will attempt to open an X Window session on the PC at your IP address. This works if you have the X-Win32 or other X Window server software running on your PC and have an open SSH session on dave2 (using xterm or PuTTY). The showrun script tries to detect which method is being used to access the server from your PC's IP address. Using the analysis software in this way is just as described above on X-Win32 or other remote X sessions. In cases where this doesn't work, for instance if you are off-campus with no ssh session running, or on a PC with no X Window software installed, the alternate link "Or analyze via Secure-VNC will open a browser-based VNC viewer applet in a new tab in your web browser, to begin a VNC session as described below. Either of these analysis links will open up an analysis program window with the run you were viewing as the current run to be analyzed. If analysis parameters were specified via aparm in showrun's query string, these same parameters will be set for you in the analysis window. 6. Using VNC, in or out of your Web Browser
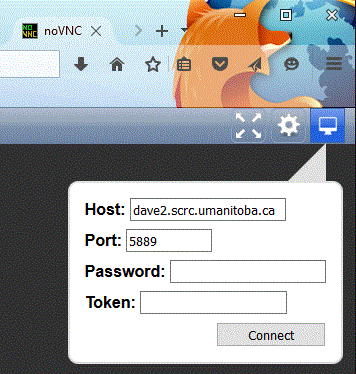
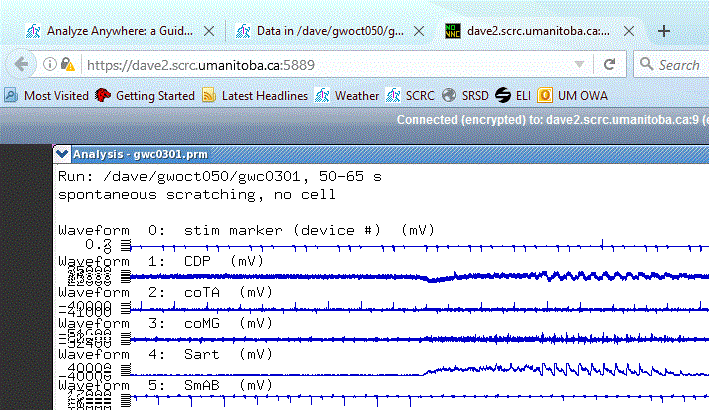
In order to truly allow SCRC users to analyze anywhere, we've added a VNC server to our analysis server, dave2, and we have recently added the noVNC client which allows secure VNC connections to the server from within your browser. This starts a VNC session without needing to install any special software on your PC. All it requires is a current web browser with support for HTML5 WebSockets and Canvas. Firefox, Chrome and Microsoft Edge browsers have been tested. Internet Explorer is not supported by this software. While you could use any VNC client to access the server, or load the noVNC applet by requesting it directly from our server, the most convenient way to get the process started is by browsing the data archives on the web, as described above, and using the link on the summary page to analyze via Secure-VNC. This will typically open another tab in your web browser to load the noVNC viewer applet, which will then open the VNC session. The first step, shown in the figure to the right, requests the connection details, specifically the server host name and port number, as well as the password. The default values for host and port are filled in automatically, so generally you just need to enter the password then click Connect (hitting Enter has no effect here). The user name isn't entered here, as all VNC sessions on dave2 run as the user "exp". Once connected, the viewer opens an X Window session on the analysis server, displayed in the same browser tab. Using analysis in this way is very much like the X Window session you'll get when you login to the analysis server at the console. There are, however, a few important differences:
When you are done with your VNC session, and have closed all your application windows, all you need to do is click the close button on the VNC viewer tab, and you should be back at the summary page for the run you were viewing. You do not need to logout from the session running on the VNC server.
7. Using Cygwin/X under WindowsBecause the analysis software is written for a UNIX-like operating system, a strictly native Windows implementation of the software would be quite difficult to develop. However, it is possible to run it under the Cygwin/X system, which emulates a UNIX-like environment under Windows. Cygwin/X is a port of the X Window System to Microsoft's series of Windows operating systems, including an X Window server, libraries and many of the standard X applications. It is built upon the Cygwin project, which provides a UNIX-like set of libraries and utilities which ease the porting of UNIX/Linux applications. A Cygwin/X installation requires about 500 MB of disk space, but its memory requirements are fairly minimal. Cygwin/X should run well on 32-bit versions of Windows XP, Vista, 7, 8 & 10, as well as the 64-bit versions of Windows Vista and later. Installing Cygwin/X is fairly straightforward. Begin by downloading the installer: go to http://x.cygwin.com/, scroll down to the "Downloading and Installing" section, then click on the "setup-x86.exe" link to download it and save it to a file. Cygwin now offers a 64-bit version, with the setup-x86_64.exe installer, which you can use instead if you're running a 64-bit version of Windows 7 or later. However, the 32-bit version of Cygwin works fine on both 32-bit and 64-bit versions of Windows. It's a good idea to rename it to "cygwinsetup.exe" so that you'll know what it's supposed to setup when you come back to it later. You should review the installation section of the Cygwin/X User's Guide to see what the installation involves. Follow the steps below, which include some additional packages to install. Run the installer and click on Next to begin installation. Select "Install from Internet" as the installation type and click Next. Stay with the default Root Installation Directory, C:\cygwin, and the default installation for "All Users" (for which you need administrative privileges, otherwise choose "Just Me"). Keep the Default Text File Type as "Unix / binary", and click Next again. You then select the Local Package Directory, as illustrated in step 9 of the Cygwin/X User's Guide installation instructions. The choice isn't critical as the setup program will find this again in the future, but a good choice that can be found easily from either Cygwin or the Windows Explorer is "C:\cygwin\download". Click Next again, and the installer asks you to select your Internet connection type. In most cases the default, Direct Connection, is what you should use. Click Next again to proceed. It asks you to choose a Download Site from a list of Cygwin mirror sites. This is step 13 in the User's Guide installation instructions. The best choice for North American university sites is probably http://mirror.cs.vt.edu or http://www.mirrorservice.org, about 1/4 to 1/3 the way down the list, as they have a high speed link to CA*net 4/NSFnet, as do most universities. Click Next after choosing the site. Note: instead of running setup-x86.exe or setup-x86_64.exe directly, you can instead download and run one of the following two batch files: cygxinst32.bat, for the 32-bit setup-x86.exe, or cygxinst64.bat, for the 64-bit setup-x86_64.exe. These will set a few default options for the installer, as well as pre-select all the necessary packages. You can still go though the package selection below, if you want to add more software, but the pre-selected packages should now be sufficient for running all the SCRC software. You will now have to select the packages to install. There are a huge number to choose from, but only a handful are really needed. This is shown in step 15 in the Cygwin/X User's Guide installation instructions. Packages are selected by clicking once on the word "Skip" to the left of the name of the package you want. The word "Skip" will then be replaced by the version number of the package that will be downloaded. The setup program will also automatically select any packages that are required by the one you selected, so by picking only a few packages, you can select the whole system you need. Packages are organized into categories to make them a bit easier to find, without having to wade through a list of all packages (though you can do that if you want, by clicking on the View button until it shows a Full list of packages, or a list of those Not Installed). In the Category view, click on the "+" sign next to a category to expand the list of packages in it. As the User's Guide recommends, you should install xorg-server and xinit from the X11 category, but for purposes of running the SCRC Analysis Software package, you should install all of these:
byacc, gcc-core, gcc-fortran, gcc-g++ and make in category Devel If you need to run the Watson-Williams circular statistics in the gensspp program, or SVG output from regcomp, you must also install these: libiconv-devel, libicu-devel, libintl-devel, liblzma-devel, libpcre-devel, libtirpc-devel and zlib-devel in category Libs If you would like to use the audio conversion scripts wf2wav, wf2mp3 or wf2dsp, install: lame and sox in category Audio These, and the packages they require (which are automatically seleted), should be sufficient. Then click Next. Note that from time to time, packages may be moved to other categories, or their names changed slightly. If you can't find exactly these packages in the categories listed above, use the Search feature to locate them, or the next closest thing. The Search feature also makes it easy to find the packages you need when viewing the Full list, so you may find this is more convenient than looking through all the categories for the packages you need. The setup program will then download all required packages, and after they're downloaded it will install them. When it's finished, it will give you the option of adding icons to the Desktop and Start menu (checked by default). The Desktop icon is optional, because you don't use that one for running X Window applications, but you should install the Start menu icons. Click the Finish button to complete this phase of the installation. In summary, all the default choices are OK, except that you must select a download site and the packages you need, as there are no defaults for these, and you can pick a better location than the default one for storing the downloaded packages. After that, Cygwin/X is ready to use, and the analysis software can be installed from a .tgz package that we provide. Printing support for the analysis software can be set up by installing the GSPRINT software under Windows. To start up Cygwin/X, click the Windows Start button, select All Programs (on Windows 7), select Cygwin-X, then select "XWin Server". The Cygwin "X" icon should appear in the task bar's notification area on the right, and right-clicking it will show a small menu. (See figure above at the right.) There may also be an "xterm" window that opens up automatically when you launch Cygwin/X, but you can start one any time by right-clicking on the X in the task bar, then selecting "xterm" from the menu (or from an Applications sub-menu, depending on how your .XWinrc file is configured). If you don't see the "X" icon in the notification area at the bottom-right, it might be hidden behind the little up-arrow icon. Clicking on that icon will pop-up a display of all hidden notification icons. You can also select which icons appear on the taskbar to customize the notification area to always show this "X" icon. For Cygwin/X systems, the C: drive is accessed using the UNIX-like path /cygdrive/c. Cygwin doesn't use a virtual disk, but rather stores its files under the C:\cygwin directory by default, so your Cygwin home directory will be found under Windows using the pathname C:\cygwin\home\yourname. The choice is yours whether you prefer to keep your files under your Cygwin home directory, your Windows Documents directory, or elsewhere for that matter. Also note the important points on Linux file paths below. Note: There is an outstanding bug in the Cygwin-X XWin Server launch shortcut in the Start menu, which makes starting the server unreliable under recent Windows 10 systems (Creator's Update). The bug, and a fix for it, have been reported on the Cygwin mailing list. If you encounter this problem with Cygwin-X on Windows 10, try to fix the start menu entry as described there. 8. Using WSL or other Virtual Machines under WindowsIt is also possible to run a supported Linux system under Windows 7/8/10 using various virtualization techniques. Of those we've tested so far, one of the more promising ones (for recent Windows 10 systems at least) is Bash on Ubuntu on Windows Subsystem for Linux (WSL) which runs a minimal Ubuntu Linux system on an emulated Linux-compatible kernel environment directly under Windows. For displaying graphical output from Linux applications, we use a 64-bit version of the Xsrv+PuTTY on a Stick package. A Bash/Ubuntu/WSL installation requires about 2 GB of disk space. Note however that WSL can only run on 64-bit versions of Windows 10 Creator's Update (1703) or later, not 32-bit versions nor older versions. (While WSL does run on Anniversary Update version 1607, there are a number of problems in WSL in that version that make it unsuitable for installing and running the analysis software. These are fixed in version 1703.) Other Windows systems should probably use Cygwin or some other virtualization system. Installing Bash and WSL is quite easy: just follow Microsoft's Bash Installation Guide, which outlines and illustrates the steps involved. The next step should be to install the latest Ubuntu updates, by running the following commands in the bash terminal window:
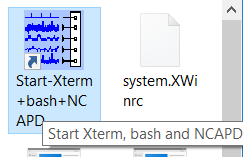
If there are problems connecting to the update servers, it's possible that a third-party firewall or anti-virus product is blocking Internet access in WSL. We had such a problem with Kaspersky Enterprise Security version 10.2.5.3201 which we run on most of our systems. Upgrading KES to version 10.3.0.6294 fixed that problem. After that, you can install the data capture and analysis software, or just the analysis software, using a set of installers we provide. These installers will also set up the VcXsrv software in a folder on your Desktop, with some customizations for working with Bash on WSL. Printing support for the analysis software can be set up by installing the GSPRINT software under Windows, as for Cygwin systems. To start Bash and WSL, open the VcXsrv folder, and double-click on the "Start-Xterm+bash+NCAPD" icon (or "Start-Xterm+bash" icon for analysis-only installations). The VcXsrv "X" icon should appear in the task bar's notification area on the right, and there should also be an "xterm" window that opens up. You can also start a new xterm window by right-clicking on the "X" icon and selecting "New xterm Session..." from the menu. If you don't see the "X" icon in the notification area at the bottom-right, it might be hidden behind the little up-arrow icon. Clicking on that icon will pop-up a display of all hidden notification icons. You can also select which icons appear on the taskbar to customize the notification area to always show this "X" icon. The WSL system runs from its own portion of the Windows file system, but for simplicity, it's best to work in your own Windows home directory. The Start icon above is set up to run bash in that home directory, rather than the Ubuntu home directory. In this emulated Linux environment, your Windows C: drive appears under the /mnt/c directory. Note two important points.
Apart from these important differences, though, the use of the analysis software under Cygwin or WSL is very much the same as under any other Linux system, using the same commands and the same techniques to navigate and manage directories and files. Because our WSL setup displays using the VcXsrv X11 server for Windows, and Cygwin/X uses a similar X11 server for Windows, using the analysis software under either will be very much like running it on X-Win32 or other remote X sessions, and the same caveats will apply regarding mouse button usage. Indeed, you can use this setup to launch remote X sessions to other Linux servers, by using an "ssh" command as described above. These ssh commands may even be added to Cygwin's XWin menu, for quick, easy and secure remote sessions. Our Xsrv+PuTTY package, which we use with WSL, includes configuration entries for starting ssh sessions with all our Linux servers through PuTTY. 9. Using the Mouse ButtonsThe mouse operations in the analysis software depend on single clicks on a 3 button mouse - no click and drag or double-click operations. But because this software can run on so many different platforms, this raises the question of what to do when you don't have a 3 button mouse, or when not all mouse buttons work as expected. First, the simple case: on most Linux systems today, you will typically have a 3 button mouse or 2 button wheel mouse. When the analysis software expects mouse input, it will typically show a menu that describe the function of 3 or more buttons. The first 3, A, B and C, correspond to the 3 buttons on the mouse, from left to right. On a wheel mouse, the scroll wheel replaces button B, so pressing down on it is the same as clicking the middle button on a 3 button mouse.
This all works well in most situations, but in some cases not all of the mouse buttons work as expected. This is especially true when running under X-Win32 or other remote X sessions, where the middle button or wheel click may not go through to the X Window application as a middle-click. Some mouse drivers either don't support the middle button, or reassign the middle button to some purpose, such as a simulated double-click of the left button. If the mouse driver doesn't make it easy to set the middle button to a normal, middle-button-click operation, or you prefer to keep the reassigned operation for your other applications, then you need an alternate way of getting the middle-click, or button B function in the analysis software. The most reliable way of doing this is Shift-left-click, i.e. hold down the Shift key and click on the left mouse button. Similarly, Ctrl-left-click will get you button C if a right-click doesn't work, if the right button is reassigned, or if you have a one-button mouse (e.g. an older Apple mouse) or one-button trackpad. On some systems, simultaneously pressing the left and right buttons simulates a middle-click, but that does not always work reliably, or sometimes not at all. Also, pressing the A, B or C key on the keyboard may do the trick as well, but not equally in all analysis programs (it won't work in qm, for example). So, your best bet is to use Shift-left-click for B if the middle button doesn't work, and Ctrl-left-click for C if the right button doesn't work. 10. Password SecurityBecause many of the methods of connecting to the SCRC's analysis server, which we had implemented in the past, send your password unencrypted over the network, we have shut these methods off in favour of more secure alternatives. Methods such as X Window sessions launched via rexec, Remote Desktop via xrdp, Java-based VNC and web browser access via http (rather than https) should only be used on trusted networks, where you do not need to be overly concerned with passwords sent as clear-text being intercepted. On unsecured public networks, whether wired or wireless, you should not use these methods to access the server, as your password could easily be captured by someone operating a Packet analyzer or Man-in-the-middle attack. The most secure method of connecting to our servers, when you can't be certain that the network you're on is safe, is to launch an X Window session via SSH as described above. SSH will create an encrypted "tunnel" through which all your network traffic for the X Window session is channeled, including your user name and password, so these can't be intercepted. It also will verify the server's encryption key to make sure there isn't another system attempting to masquerade as one of ours. If you're planning on travelling and think you may need to access our systems from public networks, you should make sure that your laptop computer is set up ahead of time for secure access via SSH. It doesn't take very long to set up, and once it's done, you can have the peace of mind of knowing that access to our systems is convenient and safe. With a bit of planning, you really can analyze anywhere. See also: SCRC Software On-line Documentation, SCRC Software Tutorials |
|


|
|
© Copyright 2017 G. R. Detillieux,
Spinal Cord Research Centre,
University of Manitoba.
All Rights Reserved.
Contact Us
for more information.
| Revised May 23, 2018. |
|