Tutorial 3
Normalize step-cycles, average waveform amplitude and the Layout program
Step cycles are defined usually by choosing a recorded ENG waveform that shows long lasting, continuos, consistently patterned locomotor activity with an acceptable amplitude. Looking at all the waveforms displayed you can select the best waveform to be used for defining the flexion and the extension phases of the step cycles. We selected LGS (wf # 4) activity as the reference waveform to define the step cycles.
3.1 Defining step-cycle phase visually based on waveform activity
In the analysis program load the c08-01 data file and set range for 44-94s to display the raw waveforms (no trace display necessary at this time).
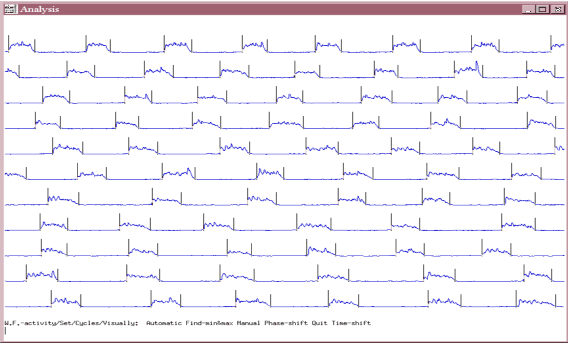
Select the Waveform option from the Main menu and enter 4. Then select Set and Cycles and Visually. As shown in Fig 3.1, you will see a waveform displayed with vertical bars. W:4<CR>,S,C,V,
Fig 3.1
First select Automatic to set the cycles. You will see a horizontal (base) line that you can adjust by left clicking with the mouse at higher or lower levels. The baseline is there to define the beginning of the cycle. If the waveform activity crosses the baseline level, the cycle-start is marked and when the waveform activity crosses the baseline again (in its falling phase), the cycle-end is marked. Using your mouse (the left button) adjust the baseline to a level so that you create vertical lines around the active phases of the displayed ENG. Then hit Done and select Manually from the menu. This option allows you to fine-tune your cycle selections. Look on the bottom of the window for how to use the mouse and the keyboard for adjusting the vertical lines. When done setting the cycles, hit D for done and do Quit, Quit, Quit, then enter 4 for the waveform number to keep and hit CR. Do Quit again and you should be back in the Main Menu of Analysis. A,D,M,(adjust),D,Q, Q, Q, K,4<CR>,Q
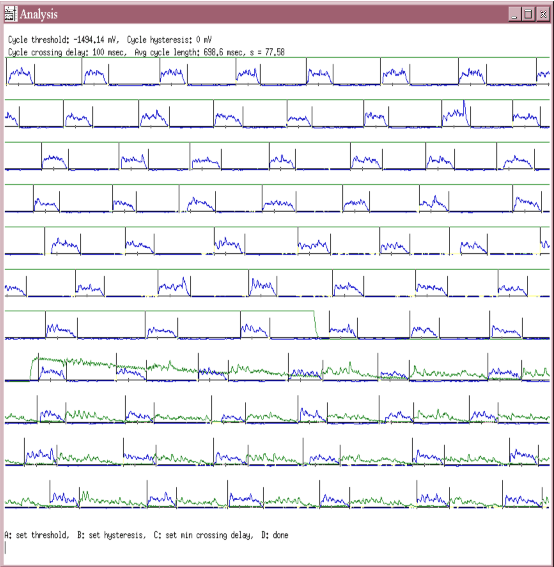
You have just set the step cycles for an extensor waveform by defining the start of extension as the point where the extensor ENG amplitude crosses a baseline. However, there is an important question we have not addressed before setting the cycles. That is: What point should be called the beginning of a phase? Should that point be determined by the increasing activity in the ENG (i.e. when the ENG crosses a baseline) or should that point be determined by the end of the previous phase ( i.e. the beginning of extension should be set when a TA ENG burst ends)? That is OK to use either way to set the cycles. It all depends on how do you define “step cycles” and how precisely your further analysis requires you to be precise in discriminating between flexion and extension phases. For example, from the point of view of the locomotor drive potential (LDP) that is delivered to the MNs during locomotion, you would have to be aware that LDPs actually start sooner than the increase of the ENGs. So if you define the beginning of extension as the point where the extensor ENG crosses a set baseline, then you would probably miss the time of the LDP delivery to the extensor MNs. Depending on the locomotor pattern in other ENGs, you may get a better estimation for the beginning of LDPs if you select the end of the flexor phase (i.e. when a flexor ENG crosses a baseline on its descending course) to be the beginning of the extensor phase. For different kinds of analysis one way might be better than the other. What is important in this Tutorial, is that if you want to set your cycles so that the initiation of a phase is determined by the termination of the previous phase, then you have to display an antagonistic waveform along with the one you selected as the reference waveform. In this case, you should display a good flexor waveform along with the chosen extensor (LGS) reference. What you will see after overlaying a flexor waveform on the reference waveform (LGS) is shown in Fig 3.2. There they are: LGS and Sart overlaid. (If you look at the raw data display of all waveforms, you can see that in the file c08-01 the TA (# 1) shows the best flexor activity although not during the whole time in the 44-94 s ms. Regardless, we have selected TA to be overlaid with the reference waveform.)
3.2 Overlay waveforms for setting cycles
In order to achieve this overlay, from the Main Menu select Set, Display, Waveform, Overlay and enter the number of the waveform you wish to overlay. In our case that is # 1 (TA). Then hit Esc to go back to the Main Menu.” S, D, W, O : 1<CR>,Esc”
(If you’d not want any another waveform to be overlaid on the one you selected for the cycle analysis, you could just enter “-1" in here.)
In order to set the cycles on LGS again (having TA overlaid), from the Main Menu you have to select Waveform, number 4, Set, Cycles, Visually (“W4SCV”). You should see a screen like Fig 3.2, with the overlaid waveforms on the screen in different colours.
Next you should define the start and the end points for the LGS bursts by selecting the Manually option. Set the start points for LGS cycles at the beginning of the increase in the LGS ENG in each burst. Set the end points of the LGS cycles at the beginning of the TA ENG activity. Note that during the period when there is no TA activity recorded, you will not be able to determine the end points of extension based on TA because you cannot tell where flexion begins. In those cases, you should set the end of flexion at the points where the LGS activity terminates. As you see, in this case we have actually used two differnt ways in setting the cycles. This is not always correct. but now this is O.K. After you set the cycles hit D, and then quit to go back to the Main Menu while saving the cycle selections (D,Q,Q,Q,K,4<CR>,Q).
Fig 3.2
3.3 Normalize flexion and extension
Many times you will find that the step cycle does not consist of 50% flexion and 50% extension throughout the collected run. To avoid errors arising from the inconsistent nature of the step-cycle duration we normalize the step cycle setting. We normalize the total length of one cycle to 1 unit on a relative scale. On this scale you can see what percentage is flexion and extension. In order to normalize the cycles, you have to select Set from the Main Menu, then Graph, then Normalize: Yes. “S, G, N: Y,Q,Q”
You can read more about cycle normalization in the Manual at Normalization.
3.4 Set parameters for cycle triggered amplitude averaging
After selecting the cycles on waveform 4, you should set this waveform to be used for cycle analysis (i.e. set it as a reference). To do that you should select Set from the Main Menu, then Cycles, then Waveform and enter 4 and hit <CR>. Then come back to the Main Menu by using Esc. S,C,W4<CR>,Esc
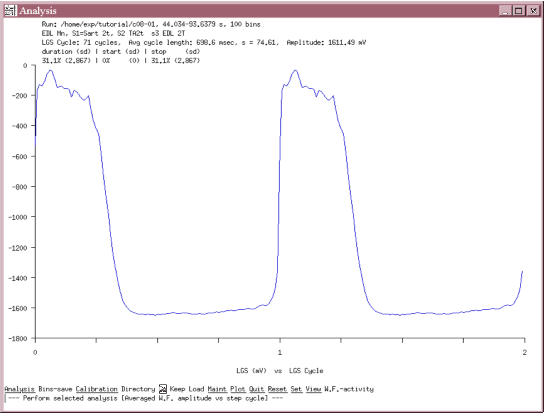
Next you will average the steps in LGS as shown in Fig 3.3. You will create the averages of the waveform amplitudes in each step based on the step cycles you set in your reference waveform (LGS). First you need to set the number of the waveform of which you want to perform the amplitude averaging. Select Set from the Main Menu, then Level, then Waveform, then Number and enter 4 (i.e. you will average LGS activity). Then hit <CR> and return to the Main Menu by using Esc. S,L,W,N4<CR>,Esc
In order for one cycle to represent only extension on the relative scale used for normalized waveforms, you have to set cycle the percentage parameter to 0. Selecting Set from the Main Menu, then Cycles, then Percent and enter zero. S,C,P0<CR>Esc
In order to set the number of cycles displayed on the graph of the averaged activity, you have to select Set from the Main Menu, then Graph, then Cycles and enter 2 so you display two cycles as seen in Fig 3.3. Then hit <CR> and Esc back to the Main Menu. S,G,C:2<CR>,Esc
Fig 3.3
3.5 Performing the waveform amplitude averaging
At this point you should have all parameters set for the waveform amplitude averaging. To perform the actual averaging, select analysis from the Main Menu, then Graph, then Waveform, then Versus-cycles, then Average and Go. A,G,W,V,A,G
Your window display should look like Fig. 3.3. On the bottom of your x-scale, note the line that says: “LGS (mV) vs LGS Cycle”. This means that you have performed the averaging of the LGS waveform amplitude (units in mV) based on the cycles set on the LGS waveform. (Should you done Sart amplitude averaging based on cycles set in LGS, your line should read Sart (mV) vs LGS Cycle.)
In the top right corner you will see a value under “duration” that represent the % activity of the LGS waveform during the step cycle. (It should read 30-35 % depending on how closely have you set the cycles to the settings we have done.) If you look on your relative scale (x-scale) that goes to 1 for one step cycle, you should see that the length of the TA activity is approximately to the % value what you read under the “duration” (i.e. 30-35% is about 1/3 of the relative unit 1). The value of % activity (duration) is the number you should use next to set the cycle percentage again. Remember, in section 3.3 you were instructed to set it to zero percent. From the Main Menu select Set, Cycles, Percent and now instead of zero, enter the value you read under duration. Then you should Esc back to the Main Menu and if you hit Go, the waveform amplitude averaging is performed by the program again and you may notice a little shift on the screen as the waveform average is displayed this time. SCP-enter the value you read under duration-<CR>,Esc,G
Technically, you could use 50% as Percent value, but often the ratio of flexion and extension burst duration during locomotion is not 50-50%. By setting the % value based on what it is during the locomotion you have recorded, you display an average that is a better representative of the locomotion you have recorded in that run.
Not only the relative ratio of flexion and extension is different from the theoretical value, but often the overlap of flexor and extensor burst is not the same as expected. The overlap of two antagonistic ENGs (flexors and extensors) should be close to zero or a minimal percent ideally. However, often there is more overlap. With our software, there is a way to determine the percentage of overlap between different waveforms. This is going to be discussed later in different sections of the tutorials.
You may print the averaged cycle using Plot, Plotter and you should print it to a file and save it as “c08-01_lgs.plt”. The file name extension “.plt” is important to use, because later you will view this file in another program of the Analysis package called Layout. P,F,c08-01_lgs.plt<CR>
3.6 Determining cycle length and burst duration (duty cycle) in each step
In the reference waveform, you have selected the step cycles visually. Most often you will also need the length of the cycles expressed in miliseconds, that is defined as the time from onset of one burst to the onset of the subsequent burst. There are two ways to get these numbers from the Analysis program. The one discussed here will allow you to get the points you have selected as the onset and offset on the reference waveform. You can download the values for these points as a asc (txt) file. You can open this file in a spreadsheet program (Excel or Quattro). If you want to get the burst durations in a waveform for each step (aka. duty cycle), then you can just subtract the onset point from the offset point. If yo want to calculate the step cycle length for each step, you can just take the difference between the two subsequent onset points. Let us illustrate this with an example. Let’s say that from the Analysis program you have generated the following set of numbers for the LGS waveform:
Column A (onset) Column B (offset)
row 1 (step 1) 43976 44581
row 2 45009 45598
row 3 46048 46644
row 4 47079 47514
row 5 48115 48537
Do not be surprised on the large value of the numbers you will get from the Analysis program. Remember, that each waveform when converted from analog to digital is made out of two numbers: one is an x-coordinate representing the time the waveform point was collected at in relation to other points (relative time scale), and a y-coordinate representing the amplitude (voltage in our case) of the waveform at the given time point. So the points that are taken from the Analysis points will be relative units. Depending on the Analog to Digital Interface, the units cam have any calibrated value. In our setup, the relative time scale of the waveforms is in milliseconds. So the points in the 2 columns above tell the location of the onset and offset markers you have set on the reference waveform in terms of how many ms apart they are from each other.
The burst duration for LGS for each step would be defined by Column B - Column A. That is 44581 - 43976 = 605 ms during the first step, then 45598 - 45009 = 589 ms during the second step and 596, 601 ms for the other steps. The step cycle for LGS would be defined by Column A, row 2 - Column A, row 1. That is 45009 - 43976 = 1033 ms for the first step, 46048 - 45009 = 1039 ms for the second step and 1031, 1023 for the other steps.
To get the actual numbers from the Analysis program, first you should select Waveform from the Main Menu. Then enter 4 since the waveform you want to do this analysis for is LGS. Then select Export from the Menu. Then select Cycles and you will be asked to enter a file name. Type “c08-01_LGS.txt”. Then using Quit and Quit, go back to the Main Menu. You should be able to transfer the txt file you have just created and open it up in a spreadsheet program. W:4<CR>, E,C,”c08-01_LGS.txt”<CR>, Q,Q
3.7 Performing amplitude averaging of other waveforms
To get the average for Sart, you should set the waveform level to number 1 by selecting Set from the Main Menu then Waveform, Level and enter 1. S,L,W,N1<CR>,Esc
Then do A,G,W,V,A,G again, and you should see a similar average as for LGS before. (Make sure you do not change the Set/Cycle/Percent value but keep it the same for the analysis of all waveforms that are based on the cycles you set in LGS.) Then save the Sart average also as a plt file: P,F,c08-01_sart.plt,Esc (also you could print it if you wish).
Then select Set, Level, Waveform, Number and set it to 11 in order to average the EDL intracellular recordings. Save this as c08-01_edl_ic.plt and also you may print it. S,L,W,N11<CR>Esc,G,P,Fc08-01_edl_ic.plt
3.8 Explain Keep Load
You should quit the analysis program now and save the parameter changes. You may have noticed already that every time you want to quit analysis, you are prompted whether or not you want to save the changes you made. This means that the program saves a *.prm file with each run file after you have made an attempt to analyse it. This prm file contains the parameters that were used for the analysis at a given time. You will probably changing the parameters often since you will usually analyse one data run multiple times, but always the last modifications will be saved in the prm file. After answering yes to save, you will be prompted for the name of the prm file under which all the changes you have made should be saved. This is usually the name of the data run you were analysing with the prm extension. In our case it should be c08-01.prm. The program by default gives you this name and you just have to hit enter to accept this option.
If you wish to change to another data file in Analysis program, you may use the Load option from the Main Menu. After selecting this option, you will be prompted for saving or not and for the name of the data file you want to it to be saved under. Usually accept both default options (yes, save and the name of the data run with the prm extension) and then you will be prompted for the name of the new data file you wish to load. Here you should enter the name of another file. Enter c08-02 to be loaded.
-Perform the raw waveform display in c08-02. A,R,G
-Set the analysis range from 21 to 70s. S,R,S,21s,<CR>,E,70s,<CR>,Esc,G.
-Set the cycles in the MG waveform. First you should overlay a flexor ENG activity, for example TA, on MG to be able to determine the cycles more precisely. Select Set from the Main Menu then Display, Waveform, Overlay and enter 6. S,D,W,O:6<CR>Esc
-Normalize the cycles. Select Set from the Main Menu then Graph then Normalize and enter “yes”. S,G,N: yes<CR>,Esc
-Set the cycles in LGS by select Waveform from the Main Menu and enter 3, then select Set, Cycles, Visually, Auto. Set the baseline to a level so you mark vertical lines around as many steps as possible. Then hit D and select Manually to fine-tune the cycle setting. After you have set the cycles, hit D, and quit to go back to the Main Menu with saving the cycle settings for waveform 3.
W:3,<CR>,S,C,V,A(set baseline),D,M(adjust cycles),D,Q,Q,Q,K,3<CR>Q
-Set MG as a reference waveform for any further cycle-based averaging that you will perform in subsequent parts of the tutorial. Select Set from the Main Menu, then Cycles then Waveform and enter 3. S,C,W:4<CR>Esc
Setting the cycles in MG in c08-02 you can quit the Analysis program. Save the changes you have made in the parameters of the c08-02 file.
In the next session you will be using the Layout program.
3.9 Using Layout to view averaged cycles
Layout can be used to construct a collection of images of the different waveform averages you have created. Type “layout” in your shell to start the program.
You should see a window of the Layout program opening on your screen with the following options on the bottom: Add Change Delete etc. This page is referred to as the Main Menu of Layout.
You should select Add from the Main Menu and use the mouse to draw a panel (a rectangle box) on the page. Draw a panel that fills up about one third of the printable page (within the dotted lines) horizontally and fills half of the page in the vertical direction. (Take a quick look at Fig 3.4 to have a better idea about the size of the panels you want to create.) You should see directions for “drawing” a panel with the mouse on the bottom of the window after you have selected the “Add” option. After you are done with the panel, hit shift with key 3 -- the “#” sign -- to copy a panel. Enter 1 for panel number 1 to be copied. Then use your mouse (left click and hold) to drag the new panel away from the original one and place it next to the first on the screen. Then do this action again and place the 3rd panel on the right side of the second one, so now you have 3 identical panels filling up the printable page. Now you have the 3 panels into which you will place the 3 waveform averages you made. (It may take you more than one attempt to come up with 3 panels that actually fit on the page, just keep trying.)
Next is to fill the panels with the files you have created in analysis. Select Fill from the Main Menu of the Layout program. Then enter the number of the panel you would like to fill with an image. Enter 1 first and when it prompts you for the name of the file to enter, you should enter “c08-01_lgs.plt”. Then you should see the name of the file you have entered appearing on the bottom of panel 1. At this point you are not seeing a picture in the panel–that is not a problem, do not worry. Then you should select Fill again and enter 2, and enter “c080-01_sart.plt”. Finally select fill, enter 3 for the panel number and write “c08-01_edl_ic.plt”. Now you should see all the names of the files in each panel.
F1<CR>c08-01_lgs.plt<CR>,F2<CR>c080-01_sart.plt<CR>,F3<CR>c08-01_edl_ic.plt<CR>
In order to view the images in the panels, you have to select View from the Main Menu of Layout and then select Both. This should give you a picture in all the panels each filled with the averaged waveforms as shown in Fig 3.4. V,B
Fig 3.4
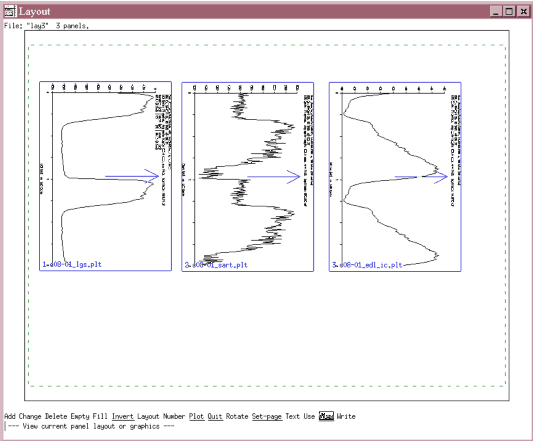
Next you will line up the 3 waveform figures under each other instead of beside each other. To get the proper alignment, you should rotate the images. Select Rotate from the Main Menu of Layout and enter 1 for the first panel to be rotated. Notice what happens when you hit enter. You should see panel 1 with an arrow pointing toward the right side of the page. Then if you select rotate again and enter 2 then do the same process for 3, you will have all the panels lined up the same way with an arrow pointing to the right side of the page. Then hit View and Both to display the waveforms and print this image (to the printer if you wish using Plot, Plotter) to a file called c08-01_wfrms.plt.
Before you quit the Layout program, you should save the panels you have created. Select Write from the Main Menu and enter a name for the layout file. You may want to enter lay3 for the name–indicating that there are 3 panels involved in this image. The files that you “Write” with layout (such as lay3) can be used only in the Layout program. You can think of them as templates–lay3 is a template for 3 panels. Later you can reload this templates and change the contents of the panels with the Fill option. Saving in Layout using “Plot” creates the files with the “plt” extension that are actually containing the data needed for our purposes.
Depending on how familiar you are with the Corel Draw program, you may transfer the “plt” files under Windows on your PC and start the Corel Draw program. Then select File in Corel Draw and then the Import option. Find the file you have just created (c08-01_wforms.plt ) and try to import it. After successfully obtaining the waveform images, you may edit this picture. Here we are not going into details about the editing of the graphs. (For your information, take a look at figure 2 in the publication Quevedo et al. 2000, J. Physiology 525.2, pp 549-564 to understand kinds of figures you may have to edit using CorrelDraw).